
Making homemade pizza dough is simple when you let your bread maker do the mixing, kneading, and rising. This bread maker pizza dough recipe uses everyday ingredients to create a soft, elastic dough that is easy to shape and bakes into a delicious pizza crust.
With flour, water, olive oil, salt, a little sugar, and yeast, you can prepare a versatile dough without kneading by hand. Simply add the ingredients to your bread machine in the recommended order, select the dough cycle, and let the machine do the work.
Once the cycle is complete, divide the dough into two portions, add your favourite toppings, and bake in a hot oven. Use it for a classic pepperoni pizza, a simple Margherita, or a homemade pizza with vegetables and your favourite cheese.
Why You’ll Love This Recipe
- Easy preparation: Your bread maker mixes, kneads, and rises the dough for you.
- Simple ingredients: You only need six basic ingredients to make the dough.
- Versatile: Use the dough for traditional round pizzas, rectangular tray pizzas, or thinner crusts.
- Make two pizzas: The recipe makes enough dough for two medium pizzas, depending on the thickness you prefer.
- Perfect for homemade pizza night: Prepare the dough in advance and customise each pizza with different toppings.
Bread Maker Pizza Dough
Course: PizzaCuisine: ItalianDifficulty: Easy2
pizzas10
minutes1
hour30
minutesThe dough cycle varies by bread machine. Check your manufacturer’s instructions for the correct programme and cycle duration.
Ingredients
300 ml warm water
1 tbsp olive oil
500 g all-purpose flour or bread flour: All-purpose flour produces a tender crust, while bread flour generally gives a chewier texture because of its higher protein content.
1 tsp salt
1 tsp sugar
5 g active dry yeast (or 15 g fresh yeast)
Directions
- Add the ingredients to the bread maker
Check your machine’s instructions before adding the ingredients, as some bread makers require liquids first while others specify a different order.
For a machine that uses the liquid-first method, add the warm water and olive oil to the bread pan. Add the flour, followed by the salt and sugar, keeping the yeast separate from the salt until mixing begins.
Add the yeast according to your machine’s instructions. If your machine specifies a yeast dispenser or a separate well in the flour, follow that method.
Measure the ingredients carefully. Too much water can make the dough sticky, while too much flour can result in a dry, difficult-to-stretch crust. - Select the dough cycle
Place the bread pan in the machine and select the Dough programme.
The machine will mix the ingredients, knead the dough, and allow it to rise. This cycle often takes around 90 minutes, although the exact time varies between models.
During the initial mixing stage, check the dough if your machine allows it. It should form a soft, cohesive ball rather than remaining as dry crumbs or spreading into a wet batter.
If the dough looks very dry, add water a teaspoon at a time. If it is excessively sticky, add a small amount of flour gradually. Allow the machine to mix between adjustments so you can assess the consistency. - Remove and divide the dough
When the programme finishes, remove the bread pan carefully and turn the dough onto a lightly floured work surface.
Gently release the dough from the pan and divide it into two equal portions. Shape each portion into a ball, handling the dough without pressing out more air than necessary.
If you are making two pizzas at different times, you can refrigerate one portion for later, following the storage guidance below. - Rest and shape the dough
Cover the dough balls with a clean kitchen towel or lightly oiled cover and let them rest for 10–15 minutes.
This short rest allows the gluten to relax, making the dough easier to stretch. If the dough keeps shrinking back while you shape it, cover it and leave it to rest for another 5–10 minutes before trying again.
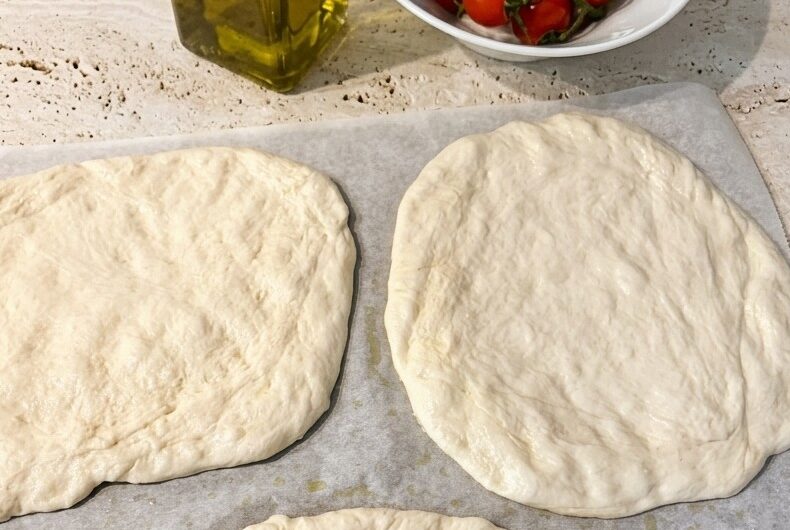
Stretch or roll each portion into a round or rectangle, depending on your baking tray. Shape the edges slightly thicker if you prefer a more pronounced crust.
For a thinner pizza, stretch the dough more evenly across the surface. For a thicker base, leave it slightly more substantial. - Add your favourite toppings
Transfer the shaped dough to an appropriate baking tray or pizza peel. Add a thin layer of tomato sauce, followed by mozzarella and your chosen toppings.
Avoid adding too much sauce or too many wet toppings, as excess moisture can make the centre of the pizza difficult to cook.
For a classic option, try my Homemade Pepperoni Pizza, which uses this dough with tomato passata, mozzarella, and pepperoni. - Bake the pizza
Preheat your oven to 245°C conventional, or to the highest suitable temperature recommended by your oven and baking equipment.
If using a pizza stone or heavy baking tray, preheat it thoroughly according to the manufacturer’s instructions.
Bake the topped pizza for approximately 10–12 minutes, checking it towards the end of the cooking time. The crust should be golden, the base cooked through, and the cheese melted and bubbling.
The exact baking time depends on the thickness of the dough, the amount of topping, and the oven. Thicker pizzas may need additional time.
Use baking parchment only if it is rated for the temperature you are using, and follow the manufacturer’s instructions for safely transferring the pizza.
Allow the pizza to rest briefly before slicing and serving.
Notes
- Measure the flour accurately: Weighing the flour is more reliable than measuring by volume and helps keep the dough consistent.
Use lukewarm water: Water that is too hot can damage the yeast and prevent the dough from rising properly.
Keep salt and yeast separate initially: Follow your bread machine’s ingredient order to support reliable mixing and rising.
Check the dough during mixing: Flour absorbs water differently depending on the brand, humidity, and storage conditions.
Allow the dough to rest before shaping: Resting helps prevent the dough from shrinking back as you stretch it.
Preheat your oven properly: A hot oven helps the pizza crust cook efficiently and develop a golden finish.
Keep toppings balanced: A lighter topping layer helps the base cook more evenly.
Which Flour Is Best for Pizza Dough?
Both all-purpose flour and bread flour work well in this recipe.
All-purpose flour produces a softer, more tender crust and is a practical everyday choice.
Bread flour usually produces a chewier texture because it typically contains more protein. It can be particularly useful if you prefer a crust with more bite.
Different flour brands absorb water differently, so check the dough during the first few minutes of mixing. If it looks too dry or too wet, make small adjustments rather than adding a large amount of flour or water at once.
Can You Make Bread Maker Pizza Dough Ahead?
Yes. Preparing pizza dough ahead of time can make homemade pizza night easier.
After the bread machine finishes its dough cycle, divide the dough into portions and place each portion in a lightly oiled, covered container. Refrigerate promptly and use within approximately 24 hours for the best results with this recipe.
Before shaping, let the refrigerated dough sit at room temperature until it becomes easier to stretch. The time needed will depend on the temperature of your kitchen and refrigerator.
If the dough expands considerably in the refrigerator, handle it gently and avoid leaving it warm for too long before baking.
Storage and Freezing
Refrigeration: Store unused dough in a lightly oiled, airtight container in the refrigerator. Use within approximately 24 hours for the best results, as yeast activity continues during refrigeration and the dough may become overproofed if stored too long.
Freezing: Divide the dough into individual portions, lightly coat them with olive oil, and place them in freezer-safe bags or containers. Freeze promptly. For best quality, use within about 2–3 months.
Thawing: Transfer frozen dough to the refrigerator and let it thaw overnight. Bring it towards room temperature until it is relaxed and easy to stretch before shaping.
Leftover baked pizza: Refrigerate cooked pizza within two hours and consume within 3–4 days. Reheat in an oven or air fryer until thoroughly hot.
Troubleshooting Bread Maker Pizza Dough
Why is my pizza dough too sticky?
The dough may contain too much water for your flour, or the flour may absorb moisture differently than expected. Add flour a teaspoon at a time during mixing until the dough forms a soft, manageable ball.
A slightly tacky dough is normal. Adding too much flour can make the finished crust dry and tough.
Why didn’t my pizza dough rise?
Possible reasons include inactive or expired yeast, water that was too hot, incorrect ingredient measurements, or a dough cycle that did not provide sufficient rising time.
Check the yeast’s expiry date, measure the water carefully, and confirm that you selected the correct programme for your machine.
Why does the dough keep shrinking when I stretch it?
The gluten may be too tight. Cover the dough and let it rest for another 5–10 minutes, then try stretching it again. Avoid forcing it into shape.
Can I use fresh yeast instead of dried yeast?
Yes. This recipe lists 15 g fresh yeast as an alternative to 5 g active dry yeast. However, yeast products vary, so follow the instructions supplied with your yeast and bread machine.
Why is my pizza crust hard rather than soft and chewy?
Too much flour, insufficient water, overbaking, or rolling the dough too thin can contribute to a hard crust. Measure the ingredients carefully and check the pizza a little earlier during baking.
Can I make this recipe without a pizza stone?
Absolutely. Use a suitable baking tray instead. Preheating the tray can help the base cook more effectively, but handle it carefully when transferring the dough.
Frequently Asked Questions
Does the bread maker bake the pizza?
No. Use the Dough programme to mix, knead, and rise the dough. Shape the dough, add the toppings, and bake the pizza in your oven.
How many pizzas does this recipe make?
This recipe makes two medium pizzas. The final size and thickness depend on how you divide and stretch the dough.
Can I use this dough for a thicker pizza base?
Yes. Divide the dough into two portions and stretch each one less thinly. A thicker base will usually require a longer baking time, so check that the centre is fully cooked before serving.
Can I add herbs to the dough?
Yes. A small pinch of dried oregano or garlic powder can be mixed with the flour before starting the dough cycle. Begin with a modest quantity so the added flavour does not overwhelm the toppings.
Do I need to knead the dough by hand?
No. The bread maker performs the kneading during the Dough programme. You only need to divide and shape the dough after the cycle finishes.
Final Thoughts
This bread maker pizza dough is a practical starting point for homemade pizza, whether you prefer a thin, crisp base or a softer, chewier crust. Letting the machine handle the kneading and rising makes the preparation straightforward, while a short rest before shaping helps the dough stretch more easily.
Once you have made the basic dough, you can use it for different toppings and pizza styles. For a classic combination, try it with tomato passata, mozzarella, and pepperoni in my Homemade Pepperoni Pizza recipe.


[…] pizza dough: Use my homemade pizza dough recipe for a fresh, flavourful […]